How to Build your own Robot Monster
Parts List
Introduction Control Circuit Hacking the Remote Building the body
Back to Home Page Back to The Frank N. Stein Project area Back to Projects
 |
Howdy Folks,
My name is Justin Ratliff and this is my
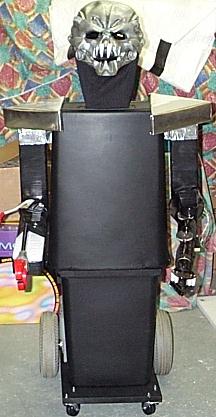
monster robot named Wally. He's a real robot that I one day hope to have running
around my house doing odd jobs. However, this past Halloween I painted him black,
made a new head for him and added a remote to run him around my porch to scare and amaze
the trick-or-treaters. Wally was indeed the hit this Halloween, kids and parents
alike loved him. I had hoped to make him run around on his own, but as it turned out
all I had time to do was add a remote to him this year. And that's what I'm going to
explain on this page, how you can make your own complete remote controlled robot monster.This
project is a little more involved than just slapping in a remote from a toy car, this
project involves making a circuit using a solderless breadboard and requires you to get
some parts from your local Radio Shack as well as ordering some items, like the motors and
it involves tracking down the right kind of wheels to go on your motors by looking around
hardware stores. It'll probably take you about a month to get all your parts
together. Of course if you have worked with stuff like this before you could get the
parts and build your monster over a weekend, cause it's really not that hard!
I'll be explaining the construction of the monster as if you the reader know nothing
about electronics and don't know a positive from a negative. |
Introduction:
I want to first point out the my robot Wally is somewhat different than the design I am
presenting. My robot has real arms and grippers, you can of course add those to your
robot and you'll find more advanced information on subjects like that throughout the Frank N. Stein project areas, but I won't go into detail
about such things on this page. My robot also uses wheel chair motors, which are
very powerful and expensive and very much not necessary for this project. I use them
on my robot because I got a good deal on them from a friend. Also you will need at
least a drill for this project.
We'll start on our monster from the ground up. You'll want to take some time to
think about what you want your monster to look like. You could make your robot look
like R2D2 if you want, all you need is a good round trash can with a round top and some
wood to make a bottom brace for the trash can to sit on at a backward tilted angle.
Whatever you do you never want to attach heavy objects to the trash can of your robot
unless you have added braces to the inside of the body, such as wood framing on the
inside. Trash cans should only be used to give your monster a cool body, never use
trash cans as the back bone of your robot.
Building the Body:
First thing we need to make is a base for our robot. The base is what we'll attach
out motors, body, caster wheels and where our batteries will sit. Wally's woodbase
is 3/4 of an inch thick and is 24 inches long by 18 inches wide. You can make your
base bigger, fancier, anything you want. Just make sure your base is not too small
for your body. If you plan on making an 8 foot tall robot, then you need a bigger
base. The base size for Wally here is just right for is 4 foot tall stature.
See if you have a small base and a huge body, your robot's wheels will spin out from under
the massive body which is shifting from a still to a moving state and your monster will
fall backwards!


|
I want to talk about the motors used on our monster for just a
moment. The motor suggested are surplus Power Wheels motors removed from children's
riding cars. These sell from catalog places like MECI
for about $6 each, part # 420-0502. They are 12-volt motors with hubs for mounting
wheels and 1/2 inch sized holes for axles or in this case we are using bolts. Now
you can remove old motors from your own old cars if you have them. some of the kiddy
car only have one motor though and our monster needs two. Also you should know these
motor are LOUD and I do mean very loud. I myself like it cause it's a monster robot,
I don't want to sound as smooth as silk, I think the noise adds character. The
battery from the kiddy cars are fine to use, but they do not last long and take a long
time to recharge in my opinion. I suggest you get a good 12-volt lead acid battery
(MECI part No.140-0130), the kind used on ridding lawnmowers or motorbikes. These
batteries will run our monster for a much longer amount of time! |
Next we need to mount our motors to your base platform. My motors are mounted in
the back behind the trash can, this allows the full weight of the body to be centered.
Wally's body was built from two squarish trash cans (no lids) mounted mouths facing
each other with a piece of wood in the middle. Each trash can has a rim which is
wide enough to drill through and screw woods screws through the trash cans and into the
wood. Four screws were used to attach each can. You'll want to set up your
bottom trash can and place your motors behind it on the base to size up were you want to
attach everything. Each motor comes ready to install with two mounting slots on each
side of the motor case. To attach the motor's to our base we need to make some wood
braces. All you need to do is get a 1 and 3/4 of an inch by 11/16 of an inch sized
piece of wood stock or similar sized piece. You'll want about 3 foot of it.
Cut two pieces from your stock to about 5" inches long, then you want to get yourself
some 1/4 inch sized bolts and nuts to attach the motors to the wood. My bolts are
3" inches long, and I used two nuts for each bolt. Once you have that
done you are ready to attach them to your base, just drill some holes through the bottom
of the base and attach the wood braces with wood screws.
You'll also want to cut two pieces to attach in-between your wood braces. You
want these extra pieces to insure your motors don't sway or give under any added weight
you might add later on. You'll want to attach the bottom trash can to the base so it
rest snug against the back of the motor braces if possible. You'll also want to use
about six to eight screws to attach it to the base. Place the screws so they go
through the can then the wood base.
Now we can attach our wheels. Lawnmower wheels are the best, but not just any
sort will do. You'll want to make sure the wheels have plastic hubs on the inside
(not steel) and have plastic spokes on the hub. The hub on our motor has teeth that
will grip the spokes of the lawnmower wheels very nicely. But often you'll need to
cut away part of the inner hub that sticks out preventing the teeth from gripping the
spokes. When you place the wheels against the motor it will become apparent what I
am talking about. The best thing to shave this extra plastic off with is a rotary
tool, with a cut off disk. A sanding disk set and battery powered rotary tool will
cost you about $30 from most any hardware store, and is a very handy tool to have.
Don't get wheels smaller than 6", they won't give you enough ground clearance.
One brand of wheel to look for is the "Arnold, 6" plastic wheel with 50 lbs.
load limit".
Complete Parts list:
Parts List for base:
1 - 24" inch long by 18" inch wide piece of 3/4 of an inch thick wood
2 - 1 3/4" by 11/16 of an inch thick wood stock cut to 5" inches long for motor
braces
4 - 1/4 round and 3" long bolts
8- 1/4 of an inch nuts (2 for each bolt)
A box of assorted wood screws
Parts List from Radio Shack:
1 - medium sized BreadBoard
$11
1 - box of prototyping wire for BreadBoards
$11
1 - DPDT 12-Volt relay
$3
1- SPDT 5-Volt relay
$2
2 - 2N2222 NPN transistors
$2 for both
2 - 1N4003 Diodes
$1 for both
2 - 1K resistors
$.50 for both
Other Items:
1 - Tyco Mini Rebound 4x4 or equivalent remote control unit from hacked car
$20 or less
2 - 9 volts
$5
1 - 12 volt lead acid battery, such as used in ridding lawnmowers
$15 or less
2 - Power Wheels motors
$16 for both
2 - free spinning caster wheels
$10 or less for both
2 - lawnmower wheels with half-inch sized holes
$12 or less for both
2 - half-inch round bolts
$3 or less for all the rest
2 to 4 - half-inch nuts
2 - half-inch washers
2 - half-inch locking washers
Misc. Parts needed:
wire nuts
electrical tape
a rubber band
lengths of wire to run to motors and batteries
Control Circuits:
Now that the body is complete we can move onto the controls of our robot. Now let me
tell you that your motors have positive and negative ends and so does your battery.
Wire the positive of a motor to the positive your battery (Red wires) and a negative from
the motor to the negative of your battery (Black wires) and your motor will spin
foward. Wire the motor in reveres to the battery (Red to black and black to red) and
your motor spins in revers. Pretty simple right? This is how our monster will
steer. Our robot will normall be in an off or inactive state. When you press
one trigger on the remote, the robot will spin both motors forward and off it goes.
Press another trigger and a forward voltage will flow to one motor and a reverse voltage
will go to a second motor and thus you can make the robot spin around on a dime.
The proccess is pretty simple. We have a remote transmitter and recever from the
Tyco Mini Rebound. The recever is wired to our motor control circuit. The
motor control circuit is like a middle man. When your remote reciever was in the
Rebound it did all the work, now the reciever is used as a boss to tell the motor control
circuit what to do. So when you press the "steering" trigger on the
transmitter the receiver goes "Hello, allright Mr. SPDT turn our motors on."
Then you press the other "go" trigger and the reciver says "Change
of orders, Mr. SPDT you stay on, but Mr. DPDT you turn on now as well." Our
Single Pole Double throw acts as a gate to the voltage avaliable to go to the motors, it's
normal state in this configuration is to NOT allow voltage to flow. But when it gets
a signal from the remote the SPDT relay switch states and allows voltage to flow to the
motors.
 |
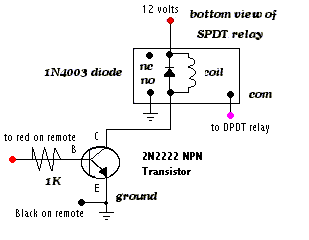
This is the motor power on/off part of the circuit you need to
breadboard and test. Your solderless breadboard is made so you just stick your wires
and components in. The SPDT relay is a magnet switch. I have drawn out what
the actually relay looks like from the bottom so you can better see how to wire this up.
See the springy looking thing in the middle of the relay? That's a coil.
If you apply direct power from your batter to the to pins of the coil, you'll hear
is click on and off as you apply and remove power from the coil. When the coil in
the relay is powered is flips a magnetic switch on the inside the is wired to the COM and
flip in-between the N.C (normally closed) and N.O. (normally open) sides of the switch
inside the relay. |
If you look at the springy coil thing you'll see a triangle with a line over it.
That is a 1N4003 diode that will be placed over top the relay when you breadboard
it. This diode stops reverse voltage which the magnetic nature of a relay can
sometime produce. When you look at your diode you'll see that is has a band along
the top of it, make sure that band is connect to the positive end of the relay (where the
relay connect to the positive) or your relay wont work. You may look at this
schematic and think you can't do this, but you can! Once you get the parts and your
breadboard it'll become apparent which way things are connected and is really not much
more that connecting LEGO pieces.
For right now you should build this circuit and ignore the rest of the circuit, so
don't wire in the remote or the DPDT relay. Also add the 1K resistor to the
transistor but don't connect the other end to anything. Once you have this built you
can test this part of the circuit with a 9-volt battery. To simulate the signal the
relay would get from remote stick in a wire in your breadboard to connect to the open end
of the 1K resistor, now if you tap the other end of that wire to the positive strip of
your breadboard you should hear your relay click on, remove the wire and it clicks off.
If you don't hear a click, check your work cause something is wired wrong and don't
move on untill you get this part to work correctly. After you get this part to work
you can build the DPDT part as seen below. One more note on the SPDT relay, because
of it's smaller size, I have found that sometime the relays can click themselves out of
their sockets, so what you want to do is wrap a rubberband around the relay to insure it
does not rock out of the breadboard.
 |
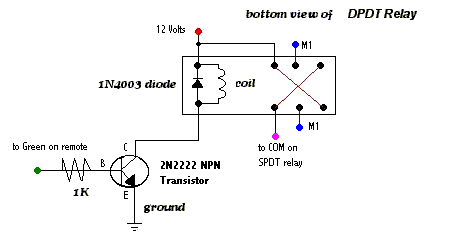
The Double Pole Double Throw relay flips the flips the voltage
to our main drive motor when sent the proper signal, this is what makes one motor go in
reverse. The second motor is simply wired up to positive and the purple line as
showen below, so the second motor can only be on in a foward direction or off. The
main driver motor can be on/off and can go in foward or reverse. Again we have a
diode going over the top of the relay and attached to each end of the relay's coil. |
However, something new we have is the "X" wiring. The six pins in the
back of the DPDT at just like the switch connatact of our SPDT on this time we hav 2 of
everything, 2 COM (which is where our main drive motor attaches to), 2 N.O. and 2 N.C.
conntacts. The N.O. and N.C. contacts will be connected in an "X" shape by
our breadboard wires.
Hacking the Remote
The remote unit of choice is the Tyco Mini Rebound 4x4, picked to hack because it had a
stop, forward and spin actions. If you choose a different remote control to hack
make sure it has a STOP state, other wise you'll have to control the monster all the time!
It was also picked because it was the cheapest I could find at the time, selling
for about $20. Now the range is nothing fantastic, but it's good enough. To
hack the remote you need to remove it from the car, so remove all the screws and take out
the electronics, you'll need to cut the wires to the motors and the battery case.
Make sure not to cut the wires to short and make sure to mark them as to which ones go
where. On my Rebound the important wires were as follows:
Parts List for base:
Yellow - positive power for remote
Violet - ground or negative power for the remote
Red - motor power on signal line (to SPST)
Green - motor direction signal line (to DPDT)
Back - ground (connect this to the black dot as indicated in the SPDT schematic)
Now our SPDT and DPDT relay schematic are actually part of the same circuit and run
from the same 12-volt battery. We don't want to power our remote receiver with
12-volts, cause it'll blow up! I found that a 9-volt battery works just fine and
will last for quit a while. You could also power it with a pack of 4 AA's to produce
6-volts, but don't go lower than 6-volts.
Also feel free to drop me a line if you have further questions or concerns. No
question is too dumb or silly. Also a note for fellow
tech heads like me, I don't need you
to send me schematics of circuits you personally feel are better suited to motor control.
Cause I already know of them and still picked relays, so }:P
to anyone that does not like relays!
-Justin R.


